

How to Paint a Rose: Step-by-Step guide with tips and tricks
- May 20, 2017
- 3 min read

My Painting of a Red Rose

Real Rose
As you all probably remember, mother's day was barely just a week ago. This meant that my house had a whole bouquet of roses, which I decided I want to paint. So, today I will be explainging the process of painting an acrylic rose. First, let's go over materials.
Materials:
• Applegreen Research™ premium acrylic paints
• a palette knife (optional)
• gesso (only needed if canvas is not white/used)
• canvas
• paintbrushes
1. Sketching
After you have all your materials, and when you have applied gesso if needed, that you can start sketching your rose. It is very helpful to use both photos of roses or actual roses. TIPS: It makes life much easier to start sketching at the center most petal of the rose, and then work your way outwards. Remember to add many layers of petals, and make sure not to make the lines of the petals too straight, as that would ruin the realisticness of the rose. Make sure to also add a stem and leaves.

2. Background
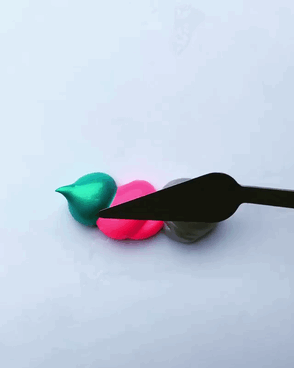
Once you have finished the sketch of your rose, you can take out your paint. You can use any color for your background, as long as it is not a color you will be using in any of your rose, stem, leaves, etc. You then paint the color you have chosen for you background (I used black) onto your canvas. Try to avoid what you have sketched out when painting the background, espescially the petals. If you can still see some of the canvas after painting, then paint a second coat and wait for it to dry. If you scroll up back to my painting, you can see that I have a textured background. If you want to create the same or similar effect, then you just need a palette knife and more paint that is the same color as your background. Put a dollop of paint about the size of a quarter, and you can create texture with the palette knife any way you want.
Here are a few *very satisfying* examples of creating texture in paint using a palette knife:


3. Petals
Now the time has come to paint the most crucial part of your painting: the petals themselves. Instead of using just one red, I used many different shades throughout the rose. Start at the center, with a little darker shade of red. As you go outwards, use a lighter shade. Be mindful to shade the shadow at the bottom of each petal, and make sure to add white to some areas to show where the light is hitting. Here are a few examples showing shading including mine:


4. Stem and leaves
The last touch to our painting is the stem and leaves. You must use different shades of the color green. Make sure not to make the stem too thick, and blend a hint of light green down the middle. If you have a dark background, try not to use a very dark green for the stem and leaves. When you finish the stem, move on to the leaves. Remember to add lighter green to show where light hits the leaves. If the leaf is bending over, the lightest part is usually in the middle. Adding a hint of yellow wherever you have a light green helps give your leaf a little *pop*.
Now you're done with your painting! If you so desire, you can add more, like another rose or maybe some gypsophila (the little white flowers in rose bouqets). Feel free to use your artistic license and remember to live it up with Applegreen Research™!


Comments